This sequence documents the finishing techniques I use for bead curtain strands. You should read the photographs left to right—that is, the spool of tigertail is presumed to be on your left, and the cut end to which you're adding beads is on the right. (Unlike jewelry, for which I precut the stringing material and often start in the middle, working towards each end, for the bead curtain, I start at the bottom and work my way to the top, leaving the strand on the spool until I'm ready finish the bottom: only then do I cut the tigertail off the spool.) Note also I do use 7 stranded tigertail, as opposed to the more expensive 49 stranded cables—I think the cheaper stuff is fine for this application (not to mention that I had lots of it to use up...) Click on each thumbnail for a 512 pixel wide version; click on that for full size if you desire to see crappy basemetal crimps in all their badly manufactured glory.
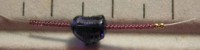
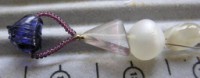
I often put a side-drilled bead—such as a heart—on the bottom of bead curtain strands, making a decorative loop. Start by stringing plenty of seed beads to form on side of the loop; add the side drill bead (sort of a purple vaguely heart shaped thingie in this case) and check to see both sides are equal (see below); then add your crimp(s—in the case of base metal I double up). You're now read to start stringing. That's covered in part one.
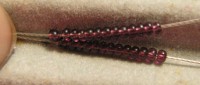
To check whether you've put the same number of seed beads on each side of your horizontal hanging bead, so that it will hang properly in the loop, open the loop to a big size and scoot the seed beads away from the side drill so you can position them side-by-side, as I have (sort of—hard to hold this and the camera at the same time:) to check whether they're the same length. This technique is also good for checking the symmetry of a bilateral piece.
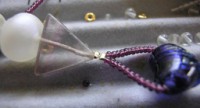
String the bead curtain strand.

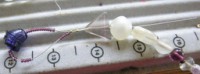
I usually put 5–6” (12–14cm) small seed beads at the top of the strand: this is the part that lies in front of the window frame, so this a) keeps large beads from hanging on the frame and b) appeals to my sense of aesthetics. Also, since there's no backlighting, this is where I feel free to use opaque beads. The 8/0 is there to give the tigertail something to go through, coming out of the crimp. I prefer not to have to cut the tigertail right at the crimp, especially with this much weight. The seed beads to the right of the image will double back to make the top loop.

If you make the loop bigger than the largest bead, then you do not have to take the pole down, remove however many strands in the way to position your new one, put all those strands (not to mention a pole heavy with beads) back: you can just slide the loop behind the pole and thread the bottom of the strand through it. This is blindingly obvious, but I didn't do this until a few months ago, and only after my partner pointed it out. Duh...
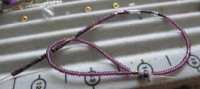
Positioning the loop back on itself in this manner is only necessary if you make the loop smaller than the beads on the strand; that is, if you're going with my old method. It does look a little nicer, though not enough to be worth the hassle, unless you plan to put all your strands on the bead curtain at once and never add any more.

Use chain nose pliers to squeeze the crimps flat. You've now completed the top of your bead curtain strand. Cut the other end off the spool, leaving 6–12” (15–30cm) extra for finishing and/or adjustments.

Holding the strand from the bottom, jiggle it gently and slide the beads down to avoid gaps. Unlike a bracelet that must have play to curve around a wrist, bead strands hang straight and should be tight.
After you've snugged up the beads in the body of the strand tightly, take the end of the tigertail back through the crimps you strung on in step 1, above.
I like putting this decorative loop not only to use up side-drill beads, but also so the end of the tigertail is pointing up—the 180 turn in the wire and the beads in the loop help to lock the bottom of the strand: even if the crimp fails, the beads are unlikely to come sliding off in a heap on the floor.
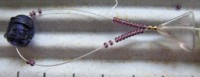
Again, I've threaded the tigertail through beads above the crimp. Grasping these, pull the tigertail smoothly and firmly tight. Uneven, jerky tightening will cause unwanted kinks in awkward places, which can cause spaces or looseness in the stringing material that are difficult to get out. Note tigertail sticking out the white pixie. The normal thing to do would be to cut it, but I don't bother: at first because I thought I might need it to adjust the length of the strand (say if I moved to a different window or wanted to even up the bottom) but now because it's not really noticeable, and if some beads break (recall that I use a lot of damaged bead in this project) or the strand falls apart, I'll have some extra. —Of course, if either of those things happened, I'd probably live with the gap of bare tigertail in the first instance and restring in the second, but I'm lazy.
Crimps crushed. Sorry about reversing the image: it comes out of my handedness. In the next post, I'll show how it's hung
file created 01apr06
Unless otherwise noted, text, image and objects depicted therein copyright 1996--present sylvus tarn.