Yeah, I know. It's the quality of the work that counts. But let's face it, if your transparencies—slides in the common parlance—are no good, it doesn't matter how beautiful, original or creative your work is. Jurors have 15 seconds, maybe, to see your stuff. It goes without saying that you should group your pieces for a coherent look; use a neutral background; crop tightly; and adjust your lighting for the piece.
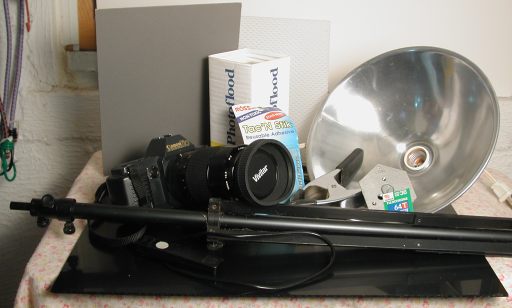
Many of the items I use. Not shown is my cute little blower brush for getting dust off the plexi and camera lens; the gremlins seem to have disappeared with it. Obviously you'll want to take the lens cap off before shooting. The hood is nice but not absolutely necessary. Mine lives on the lens all the time, since it folds up nicely. The cardboard end from the fujifilm box gets taped onto the notes. (Sorry I don't have a real box of film to show.)
Here's a list of items I use:
- SLR camera: Canon T70
- macro closeup lens: vivitar macro
- camera tripod: bogen something-or-other
- cable release
- light stand—cheap $20 is fine
- 30x40 white foamcore
- 18% grey card
- blower brush
- 64T professional film, Fuji brand preferred
- 3200K 500watt tungsten balanced lamp (bulb) ceramic socket shallow-bowl metal parabolic reflector clip light
- clamp to help mount light on light stand (cheap, DIY store)
- power strip
- diffusing material (see below)
- black plexiglass
- handi-tac
- stool or platform
- clipboard, pen, paper for notes
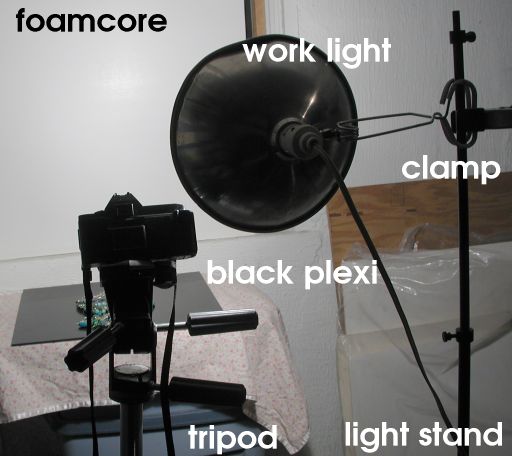
I've labeled some of the non-obvious items. Since the light stand is round and the light is designed to clamp to flat surfaces, I help hold it in place with a spring clamp. These are very useful for a variety of photographic tasks.
It looks like a lot, but you could probably get all this stuff for what it would cost you to have a top notch photographer shoot slides for one year's juries: about $500 or so. I bought the canon T70 for $225 (used); the only really problem with it is that it doesn't have a depth-of-field preview button, but since I shoot most of my jury slides in the f19–32 range, I know pretty much everything is going to be in focus anyway. You do need to have enough manual overrides to be able to set your f-stops and shutter speeds independently, so you can bracket.
The lens I use is a vivitar macro lens, and I just love this thing. Focuses beautifully, and will shoot objects as small as one inch full-size. That's important, when photographing little things like beads. Needless to say, a tripod is essential. A cable release is nice, but you could use the self-timer button, if your camera has one, instead, or simply lean on the tripod to minimize shakes as you press the shutter, otherwise.
An aside about film, lights and processing. Professional photographers use daylight balanced flash units mounted on tripods, slaved to the shutters, running off accumulators. This is what I learned on, when I took my studio photography class, and they're wonderful, but it cost about $1000 for a low-end setup. The alternative for us non-professional photographers who still want some control over the lighting is to use 64T film and matching 3200K tungsten bulbs.
Tungsten film has extra blue sensitivity to make up with the lack in tungsten bulbs: even though they seem to be outputting really white light, compared to daylight, it's yellow, though, obviously not as yellow as incandescent bulbs’. Daylight is about 6500 kelvins. As in color, not temperature. Though just to make things more confusing, sometimes folks will refer to the “temperature” of a bulb. They really mean the color of the light it puts out. Perhaps I should back up here, a little and explain: your eyes adjust to light, making fluorescent-lit objects look less green, and incandescent ones less yellow; but film can't do this. So you must match your film to your light, or use filters, which are beyond the scope of this page.
To put it simply: buy tungsten film and tungsten (3200) bulbs. And don't forget to shut off the other lighting in the room when you shoot!
Okay, you've bought your professional film and fresh new bulbs—and you've lined up a good quality professional shop to process your film. I don't need to go into a long tedious argument about the stupidity of buying good film, proper lighting, a nice lens, not to mention spending your time, just to screw up everything by taking it to the local 1 hr place with their lousy chemicals? No. Use hi-grained low-speed (ISO) i.e. 64 professional film; fresh bulbs; and professional processing. Even if you have to send it away.
After you've loaded your film (and checked to make certain your camera is set to the proper ISO rating—it should be 64, right?) the next job is to set up your piece. These pictures show stuff set up at very shallow angles. You could put the camera much higher and shoot at more of a “looking-down” angle if preferred. Often, if the piece has a big focal, and I'm shooting at the shallow angle, which makes the back of the piece recede nicely, I'll use the handi-tac to tilt up the focal bead so it shows better. This is a particularly handy trick if the bead in question is somewhat flattened.
As we're shooting shiny things—glass and metal—we need soft light. To do this, we diffuse the light coming out of our tungsten bulb. (Soft things, like textiles, generally benefit from hard, raking light.) Any flat, white, frosted plastic will do. Check out your local DIY; they often have suitable diffusers that they sell as drop-ceiling fluorescent panel covers. Use metal shears or a utility knife to cut it down to a suitable size.
Black plexi is a little trickier: go through the yellow pages and look for plastics distributors. The fun part is getting them to sell you a scrap piece. Once you get it home, peel off the protective coating, but cover it with a soft cloth when not in use, because it's very prone to scratching. When the scratches get really bad, just sand the thing to a matte surface with fine (400?) grit sandpaper—I find either surface works well. Plexi is electrostatic, so keep a spray bottle and soft rag for cleaning the dust off of it.
The white foam-core goes on the wall: you bounce the light off the wall onto the black plexi, using the diffuser to soften spill (light directly from the bulb that hits your subject). Those bright spots on the piece don't look so bad to your eyes, but to film, which doesn't have the dynamic range, those ‘specular highlights’ (hot spots) will look awful. I use 500 watt bulbs because, even so, I'm still often into slow speeds: I've shot stuff for as long as 4 seconds. Ideally, you want to keep your shutter speed around 1/15 or so, because the different colors in the film react at differing levels at really slow shutter speeds. Well, most of the time I find I'm shooting between 1/8 and 2”; I need those 500 watts. That's a honking big bulb, though; hence the need for a ceramic socket—you don't want your light to catch on fire!
So why not use two lights? Well, because I follow my teacher's philosophy about simplicity, which means one light source. Which in turns means only one set of shadows: and, since we have only one sun, and natural light is what we think of as typical, it tends to look better. If I need additional light somewhere else—say on the side or front of the piece—I use a white card (often the back of the grey card) to bounce light into an overly dark spot instead of setting up another light. I'm not saying great pictures can't be taken with multiple lights; but this is a step-by-step for my particular solution, not the distillation of even a basic studio photography class.
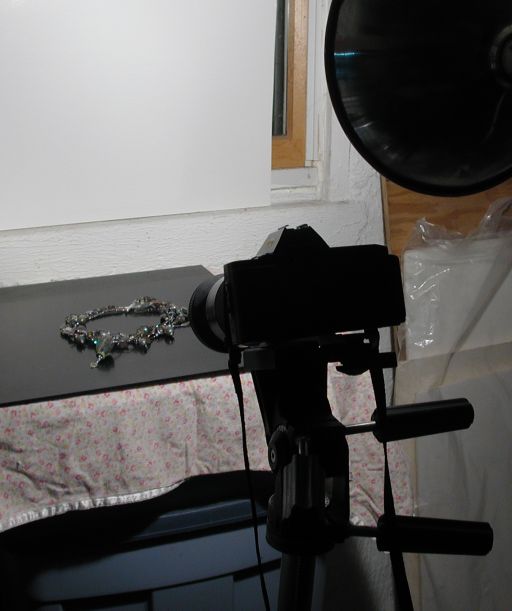
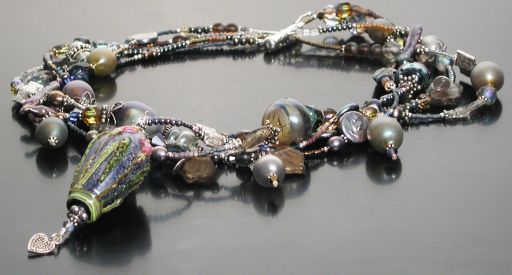
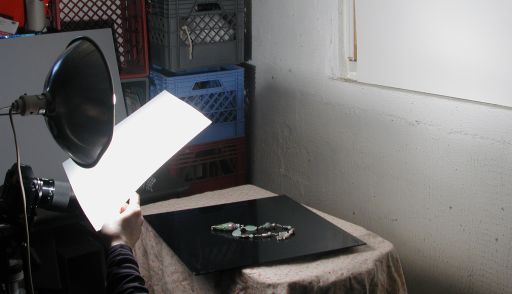
Necklace shot using the setup above. The diffuser card was used, but eliminated from the setup shot for clarity.
Okay: set the light up beside the camera, usually as close as it will go, maybe a little higher, and point it so the light bounces off the foamcore. (Notice in this shot, unlike the one above, the platform with the plexi has been moved up closer to the bottom edge of the foamcore. Sho’ nuff in the first batch of pix the texture of the white wall was reflected in the slides. Whoopsie!)
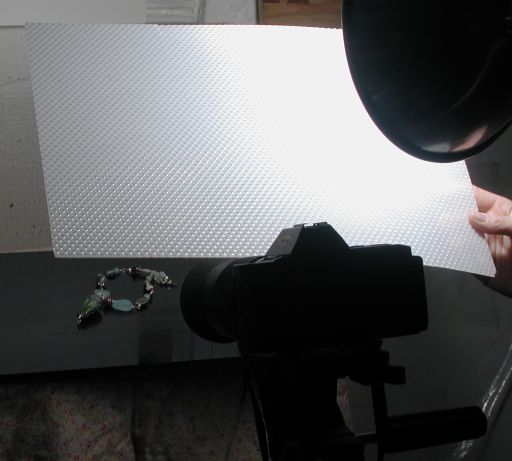
I handhold (or in this case, have my lovely assistant) handhold the diffuser (the white plastic) to prevent spilloff. Yes, it's actually resting on the lens. No, it's not a good idea to let the plastic get closer than an inch or so to a honking 500w bulb. No, it's not a good idea to hold it there any longer than it takes to take the picture, and yes, you want to play with the angles as you look through your view finder; sometimes you can get a nice dark to light shading on your background. It seems obvious, but it took me forever to figure out that it was easier to get a basic idea for positioning the light and the camera by hand-holding these things, then clamping them to the tripods for fine-tuning.
Once you've positioned your piece, your light, and your camera to your satisfaction, it's time to take a reading. I find the light meter on my camera works quite well, but you could use a light meter if you prefer. (I don't; the damn thing never seemed to give very consistant readings. I gather that's the point, but I never did really learn how to average ’em properly.) Holding the diffuser in one hand, and the grey card half an inch over the shot so it fills the frame in the other hand, depress the cable release button half-way down to get a reading...I know, you're asking, with what hand?
I really do hold the cable release and grey card in one hand, and the diffuser in the other; even more than preventing camera shake is the cable release useful for this little measurement. Worse case scenario: lay the grey card down, take your reading, pick it up, rearrange your jewelry (sigh) and then calculate your bracketing. Or get a lovely assistant to provide some extra hands. Juries are not the place to screw around with fancy depth-of-field tricks. Though lenses (I gather) work best at f8 or so, you want most or all of the piece to be in focus. I usually shoot around f19–22, and adjust the shutter speed around that. So, for example, if my reading from my grey card tells me that at f22 I should shoot at 1sec, I might do the following:
f22 1/4; f22 1/2; f22 1 sec; f22 2 sec; f22 4 sec.
If I'm feeling a little more confident of my bracketing skills, I might bracket a little more tightly:
f22 1/2; f19 1/2; f22 1 sec; f19 1 sec; f22 2 sec
Keeping in mind that f19 is a half-stop, and therefore allows tighter bracketing otherwise. (The pros with their fancy flashes just adjust the power output to the lights, in 1/10 f-stop increments.) And no, I'm not going into an f-stop and shutter speed discussion here. I'm sure somebody's posted a helpful explanation out there somewhere, and it no doubt would be far more coherent than any effort of mine. Suffice it to say as the f-stop numbers go up, the amount of stuff from the front to the back of the setup in focus goes up, and shutter speeds must get longer to compensate. As a rule, you want to focus about 1/3 of the way into your piece (from the front), or, barring that, on the focal point of the design.
Write this stuff down: your film, your lights, your f-stops and shutter speeds. Have your lab number your slides in sequence, and when you get ’em back, review them on a light table. Which were the best? With luck, the ones in the middle of the range are the best exposed. You will also find, as you get better, and bracket more tightly, that the “best” is a matter of personal taste. Send your best ones out to be copied—I've had very good results with The Slideprinter in Denver CO—they've at long last got with the program and have a website.
There are many inexpensive photo setup tips out there. Some of them are even on this site This one is a little more complicated than most I've seen, but it's also gotten us into top art fairs—probably the next step up is to hire somebody, like, say, Ralph Gabriner. So my thanks to Robert Van Marter, who patiently distilled his commercial photographic knowledge in that studio photography course.
B title added, re-indexed 3jun08.
Unless otherwise noted, text, image and objects depicted therein copyright 1996--present sylvus tarn.