This is the first in a series of posts about how I arranged my working space. Unless you're an artist trying to set up your own space, or a DIYer looking for some home improvement tips, this page will probably strike you as either incredibly boring or self-indulgent, or both.
But then, you don't have to read it:)
In 2003 we moved, and purchased a house with a “florida room” with the intention of converting into a combined flameworking and beadstringing studio. The room is roughly 10x11’, or a little over 3 meters square—almost exactly the size of my old first floor studio. Because I moved the flameworking upstairs, the sewing area and home office got moved elsewhere.
In a perfect world, the room would be hard plumbed for 2–5psi natural gas, the oxygen concentrator (located elsewhere because of the noise), and running water. Those things may happen some day, but besides satisfying my decorating urges, the immediate fixes were to improve the wiring (which, like most of the wiring in this house is inadequate and badly done) and replace the carpet, in my view an unacceptable fire hazard.
We considered putting in radiant heating, because the room is heated with electric baseboard heaters, and given the ventilation issues, heating the floor rather than the air makes a lot more sense. However, putting a boiler in for one room, since the rest of the house is heated with a forced air natural gas furnace, was prohibitively expensive. Nevertheless, the state of the floor, which is—sort of—on a slab, was bad enough that we considered, briefly, doing it anyway.
Ultimately, we concluded that if were going to fix the floor, we might as well take the whole addition off from scratch, and start over, and that, we didn't want to do. So we didn't.
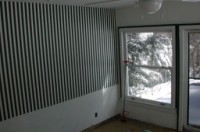
The prior owner was very proud of this room, particularly the Eastern Michigan University themed green and white striped wallpaper. I think he actually was hoping I'd keep it, so naturally it was the first thing I removed. The stripes are on the north facing wall, which is windowless, presumeably it faces the neighbor's carport. (The neighborhood predates modern setback laws.) The window and slice of doorwall face east, looking out into the back yard.

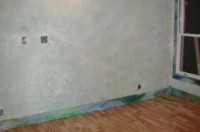
After repairing the sheetrock as best I could, I primed it. (We're back to that north facing wall.) The wizard, meanwhile, added a 20 and amp circuit for the kiln and a 4 recepticle 15 amp circuit various odds'n’ends (e.g. flexible shaft machine, radio). That, along with the three other duplexes scattered around the room, is proving to be enough wiring, at least for now.
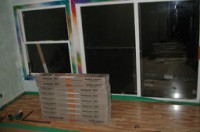
This is the west wall: the blue bar is the edge of the doorwall (the photo is shot from the deck, to which the doorwall leads.) Here you see we've removed the carpet (that green patch is a scrap) and purchased the green foam underlayment and ‘taptite’ flooring. Ideally, flameworking studios have noncombustable floors, but I felt wood would be acceptably safe; but I knew it would get burned so we got this manufactured stuff, which is quite a bit easier and cheaper to install than traditiontal 3/4” 2-1/4” wide oak. That's not to say the wizard didn't indulge in a great deal of swearing and use of a heavy sledge to pound the interlocking flooring together. (The ads show some dainty thing gently tapping it. I know someone else who also installed this sort of flooring, and they too resorted to a sledge. Worse, they installed in winter, and once they heated the room to 85–90—essential for their yoga studio—it buckled. Word to the wise: follow the directions about acclimating this stuff to the letter.) In any case floating wood flooring requires much less in the way of support than tile or poured concrete, not to mention being warmer, and easier on dropped beads, rods and tools.
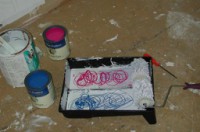
But, of course, the floor installation had to wait on the walls. It didn't take long for me to decide that the lambswool roller was far and away my favorite for applying paint, as seen here. See the paint page for more detail.
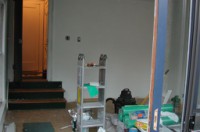
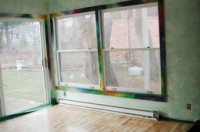
The walls and window trim (sans corner trim) are now finished, the floor about half installed. The wizard screwed the initial row down along the east wall so that it would stay put as he hammered additional rows in place. For similar reasons, he put screws in each row along the north wall as well, though he later removed those screws. I would like to assure all of you horrified by the idea of screws along two edges of the wall that the baseboard covered them up, but it doesn't. Otherwise, this type of flooring ‘floats’ on the subfloor, but the tongue and groove edging has glue that activates when you ‘tap’ it together, holding the floor together. Installing the last row, for which there's no clearance to swing a hammer, was, as you could guess, a pain.
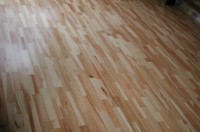
Although only the top 1/16” is real wood, I was fascinated by the many patterns I found in the maple: a side-effect of its being a lower grade meant all the interesting variations were left in.
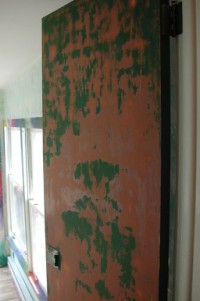
The dark green color this door was painted just absolutely sopped up the light in the little hallway from the kitchen to garage and studio, so I decided to repaint. Because latex was put directly over oil, it didn't stick very well, so I had to remove a lot of the paint using a vibratory palm sander. Joy. This was practically the last thing I painted, and for sheer technique, is my favorite, though it's in the green and pink scheme to match the kitchen.
Baseboards, painted to match window trim, now installed.
Doesn't that look nice? I never loved my studio so much as just before I moved my junk into it—so clean, so open, so full of potential. (So totally useless, but hey, who's being practical?)
All in all I spent two or three months working pretty continuously on home improvement like the studio. (The alcove, frankly, would be of greater interest to the ‘This Old House’ crowd, but that's a post for another time.) Round about April, when Bead&Button hit, I had to start making beads and living an ordinary life again; by the time our first spate of home improvement projects dribbled (or not) to a finish, I was sick of them, wanting to make beads—and fixes to the old house loomed.
In the fall, colder weather forced the wizard to install ventilation
Unless otherwise noted, text, image and objects depicted therein copyright 1996--present sylvus tarn.